E 250 Elliptical Trainer
Owner's Manual

Retain this owner's manual for future reference Read and follow all instructions in this owner's manual
Table of Contents
General Information Warnings Power Requirements Assembly Instructions Getting Started Computer Operation Maintenance Troubleshooting Parts Diagram Parts List Exercise Warnings Heart Rate Chart Warm up / Stretching Limited WarrantyGeneral Information
Thank you for choosing this elliptical trainer.
You have taken the first step to a healthier and more rewarding lifestyle.
This Elliptical is especially designed to give you reliable performance and enjoyable workouts in the comforts of your home. Below you find below the features and benefits of your new Elliptical.
- Multiple level electronic magnetic resistance.
- Low impact exercise system
- Mobility wheels for easy moving and relocation.
- Hand contact heart-rate system to monitor cardio performance.
TECHNOLOGY DATA
CAUTION:
Before beginning any exercise program always consult your physician. If you experience chest pain, nausea, dizziness or shortness of breath, stop exercising and consult your physician before continuing.
Back to TopWARNING:
To reduce the risk of burns, fire, electric shock, or injury to persons, read the following important precautions and information before operating the Elliptical. It is the responsibility of the owner to ensure that all users of this Elliptical are adequately informed of all warnings and precautions.
- Use the Elliptical only as described in this manual.
- Place on a level surface, with 3 feet (1 m) of clearance behind it. To protect the floor or carpet from damage, place a mat under the Elliptical.
- When choosing a location for the Elliptical be sure that the location and position permit access to a plug.
- Keep the Elliptical indoors, away from moisture and dust. Do not put the Elliptical in a garage or covered patio, or near water.
- Do not operate the Elliptical where aerosol products are used or where oxygen is being administered.
- Keep children under the age of 12 and pets away from the Semi-Recumbent Bike at all times.
- The Elliptical should not be used by persons weighing more than 300LBS.
- Never allow more than one person on the Elliptical at a time. Wear appropriate exercise clothing when using the Elliptical. Do not wear loose clothing that could become caught in the Elliptical. Athletic support clothes are recommended for both men and women. Always wear athletic shoes. Never use the Elliptical with bare feet, wearing only stockings, or in sandals.
- Always examine your Elliptical before using to ensure all parts are in working order.
- Never insert any object or body parts into any opening.
- Follow the safety information in regards to plugging in your Elliptical.
- Keep the power cord away from the wheels and do not run the power cord underneath your Elliptical. Do not operate the Elliptical with a damaged or frayed power cord.
- Always unplug the Elliptical before cleaning and/or servicing. Service to your Elliptical should only be performed by an authorized service representative, unless authorized and/or instructed by the manufacturer. Failure to follow these instructions will void the Elliptical warranty.
ASSEMBLY INSTRUCTIONS
Step 1:
A. Place the product in the area it will be used. a. Note: The elliptical must be placed on a level surface
Remove the Elliptical from the packaging
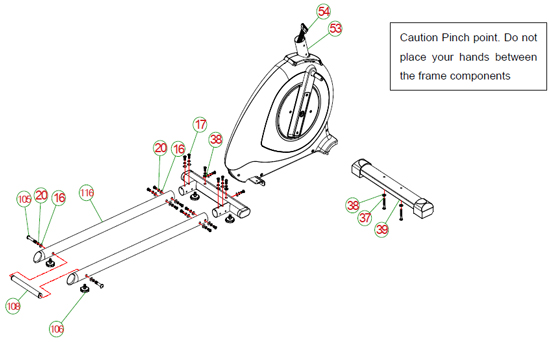
C. Attach the slider tubes (116) to the rear stabilizer (80) using 12 x M8*20mm Allen bolts (17), 12 x ?8 spring washers (20), and 12 x ?8*19*1.5t curved washers (16)
D. Attach the connecting tube (108) to the sliding tube (116) using 2 x M8*70mm Allen Bolts, 2 x ?8 spring washers (20), and 2 x ?8*19*1.5t curved washers (16)
E. Attach the rear stabilizer (80) to the main frame (53) using 4x M8*20mm (17), 4 x ?8 spring washers (20), 2 x ?8*19*1.5t curved washers (16), and 2 x ?8*19*1.5mm flat washer (38). Note: the flat washers are used on the bolts attached through the top of the rear stabilizer.
F. Attach the front stabilizer (39) to the main frame (53) using 2 x M8*55mm Allen bolts (37) and 2 x ?8*19*1.5mm flat washer (38).
G. Tighten all bolts now.
Step 2:
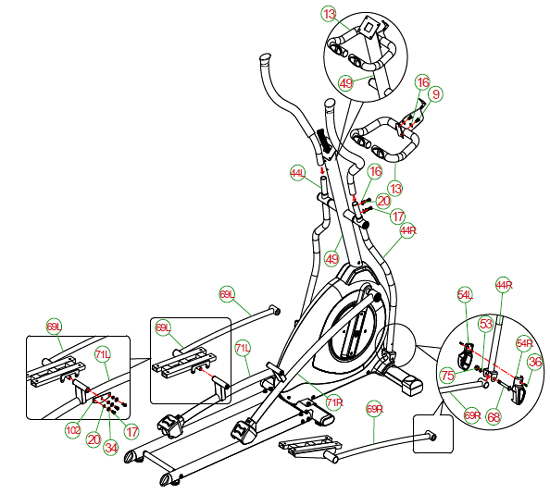
A. Slide the handlebar post cover (36) onto the handlebar post (55).
B. Connect the upper computer cable (3) with the lower computer cable (54) put the excess cable in to the handlebar post.
C. Insert the handle par post (55) into the main frame (53) by using 6 x M8*20mm Allen bolt (17), 6 x ?8 spring washers (20), 6 x ?8*19*1.5t curved washers (16).
D. Tighten all bolts now.

Step 3:
A. Insert the rotation rod (14) into the handlebar post (55).
B. Slide 1 x ?19.5*38*0.5mm (15) on to each side of the rotation rod (14) prior to attaching the lower handlebars (49L & 49R)
C. Attach the lower handlebars (49L) and (49R) onto the rotation rod (14) Note: Be certain the correct handlebare is attached to the correct side of the post before securing.
D. Secure the lower handlebars, using 2x M8*20 Locking Allen bolt (9), 2 x ?8 spring washers (20), and 2 x ?8.5*36*3tmm flat washer (19).
E. Tighten all bolts now

Step 4:
A. Attach the left pedal arm (77L) the left side crank (66)
B. Secure the left pedal arm to the crank by using 1 x M8*20 Locking Allen bolt (9), 1 x ?8 spring washers (20), and 1 x ?8.5*36*3tmm flat washer (19).
C. Attach the decorative cover (104) on to the left pedal arm by using 2 x M5*15 round head screw (40)
D. Place the left pedal arm on to the slider tube.
E. Repeat the process above for the right side.
F. Tighten all bolts now.

Step 5:
A. Attach the left pedal connecting to tube (75L) to the left lower handlebar (49L) by using 1 x M10*78mm Allen bolt, 1x ?10*19*2t mm flat washer, and 1x M10 nut.
B. Attach the left pedal connecting tube (75L) to the left pedal arm (77L) by using 1 x Fixing plate, 3 x M8*20mm Allen bolt (17), 3 x ?8 spring washers (20), 3 x ?8*19*1.5mm flat washer (38).
C. Tighten all bolts now.
D. Attach the decorative cover (60L) to the lower handlebar (49L) by using 2 x M5*15 round head screw (40)
E. Repeat the process above for the right side
F. Attach the stationary handlebar (13) to the handlebar post (55) by using 2 x M8*20 Locking Allen bolts (9) and 2 x ?8*19*1.5t curved washers. Tighten bolts now
G. Insert the left upper handlebar into the left lower handlebar and secure by using 2 x M8*20mm Allen bolt (17), 2 x ?8 spring washers (20), 2 x ?8*19*1.5t curved washers (16).
H. Repeat the process above for the right side
I. Tighten all bolts now.
Step 6:
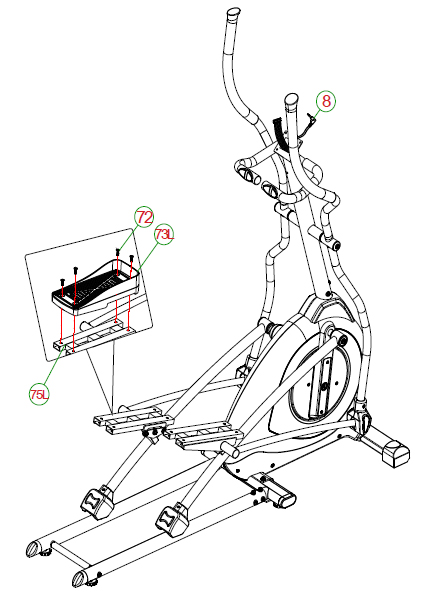
A. Attach the left pedal (73L) to the left pedal connecting tube (75L) by using 4 x M8*20mm Allen bolts (72)
Step 7:
A. Remove the 4 console screws (2) from the back of the computer console.
B. Connect the upper computer cable (3) to the computer console cable (4) Note: put the excess wire in tot eh handlebar post
C. Attach the computer console (4) to the handlebar post (55) by using the 4 screws (2) removed from the procedure above.
D. Tighten all bolts now.

Congratulations your Elliptical is now ready to use.
GETTING STARTED
PLACEMENT IN YOUR HOME
- Do not place the Elliptical outdoors.
- Do not place the Elliptical near water or in high moisture content environment.
- If your room is carpeted, check the clearance to make sure there is enough space between the carpet fiber and the Elliptical slider tubes. If you are uncertain, it is best to place mat beneath your Elliptical.
- Place the Elliptical at least 3 feet from walls or furniture.
LEVELING THE BASE
It is important that you place the Elliptical on a firm level surface. Check the Elliptical to ensure the frame is level once you have moved the Elliptical into the place of your choice. There are 4 levelers under the slider tubes at the rear and middle of the elliptical. Adjust the side to side and front to back leveling by turning the levelers either clockwise to lower or counter clockwise to raise the elliptical frame.
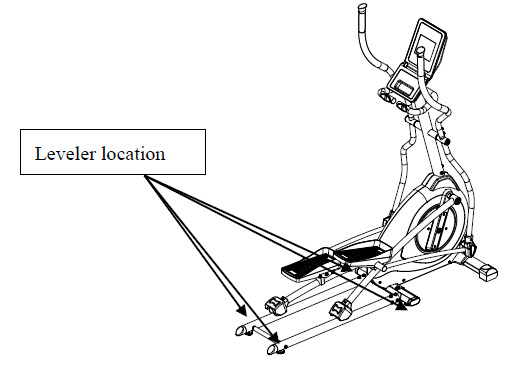
CAUTION!
Make sure the elliptical is positioned on a stable level surface. If the elliptical is positioned on an uneven surface?it may cause damage to the pedal arms and slider tubes.
GETTING ON AND OFF THE ELLIPTICAL
Take care when getting on or off the Elliptical. Step on the lower pedal and use the handlebars while getting on or off.
During your exercise, keep your body and head facing forward at all times. Never attempt to turn around on the Elliptical when working out.
MOVING THE ELLIPTICAL
Caution: This equipment is heavy and, if it is not handled properly, may cause injury
Back to TopOPERATING THE CONSOLE

DISPLAY FUNCTION
| TIME | Count up - The time will count up from 00:00 to maximum 99:59 with each increment is 1 minute. Count down - If training with preset Time, Time will count down from the preset to 00:00. Each preset increment is 1 minute between 01:00 to 99:00. |
| SPEED | Displays current training speed. Maximum speed is 99.9 KM/H or ML/H. |
| RPM | Displays the Rotation Per Minute. Display range 0~15~999 |
| DISTANCE | Accumulates total distance from 00:00 up to 99.99 KM or ML. The user may preset target distance data by pressing the UP/DOWN button. Each increment is 0.1KM or ML. |
| CALORIES | Accumulates calories consumption during training from 0 to maximum 9999 calories. (This data is a rough guide for comparison of different exercise sessions which is not intended for medical treatment. |
| PULSE | User may set up target pulse from 0 - 30 to 230 and computer will beep when actual heart rate is over the target value during workout. |
| HEART SYMBOL | When monitor receives the heart rate signal, the symbol will begin blinking. |
| WATTS | Display current workout watts. Display ranges 0~999. |
| Recovery | After exercising press the recovery key and hold the heart rate hand grips until the display reads F1, F2, F3, F4, F5, or F6. This function will test how rapidily your body recovers to a normal resting heart rate. F1 is the lowest rated result (worst) and F6 is the highest (best) Press the recovery key again to return to the main screen. |
| Temperature | The room temperature will be displayed when in sleep mode |
| Calendar | The date will be displayed when in sleep mode |
| Clock | The time will be displayed when in sleep mode |
| Sleep mode | When the machine is not used for 4 minutes the computer will enter sleep mode |
OPERATING INSTRUCTIONS
POWER ON
This is a self-generating machine and does not require external power. To power the computer display you must be using the machine for it to function.
INITIAL SET UP
Setting the date, time odometer and back light brightness
1. Power up the machine
2. Press the TEXT MENU KEY until the desired function is displayed on the screen
3. Press the MODE key to confirm
4. Press the UP or DOWN KEY to adjust the numerical value
5. Press the MODE key to confirm
6. When completed press the START (P ) or STOP (P ) key to return to the main screen
PROGRAMMING MODE
Setting USER information (U1 ���¢�������� U4):
1. U0 will blink on the screen and is a preset user mode and cannot be adjusted. You can choose USER profile 1 ���¢�������� 4 by pressing the UP or DOWN keys.
2. Press the MODE key to enter
3. The name setting will blink on the screen. Press the UP or DOWN keys to adjust the name character is displayed.
4. Press the MODE key to enter
5. The age setting will blink on the screen. Press the UP or DOWN keys to adjust the age value.
6. Press the MODE key to enter
7. The weight setting will blink on the screen. Press the UP or DOWN keys to adjust the weight value
8. Press the MODE key to enter
9. The height setting will blink on the screen. Press the UP or DOWN keys to adjust the height value
10. Press the MODE key to enter
11. The gender setting will blink on the screen. Press the UP or DOWN keys to adjust the gender value
12. Press the MODE key to enter
13. Press start to begin the workout in manual or choose from the preset programs.
MANUAL PROGRAM
NOTE: the computer will default to the goal that end first and will end when that value reaches 0
1. After entering the USER information press UP or DOWN to choose the type of program.
2. Press MODE button to confirm.
3. After selecting MANUAL mode, press UP and DOWN buttons to increase and decrease the starting resistance level (from 1 to 16)
4. Press MODE button to confirm.
5. Adjust the time by pressing the UP or DOWN buttons
6. Press MODE button to confirm.
7. Adjust the distance by pressing the UP or DOWN buttons
8. Press MODE button to confirm.
9. Adjust the calories by pressing the UP or DOWN buttons
10. Press MODE button to confirm.
11. Press start to begin the workout
12. Level is adjustable during workout.
PRESET PROGRAM
1. After entering the USER information press UP or DOWN to choose the type of program.
2. Press mode to confirm the program type.
3. After entering the Preset Program, press UP and DOWN to select program profile from P1 - P12
4. Press MODE button to enter the program profile.
5. Press UP and DOWN to adjust profile level.
6. Press mode to confirm.
7. Press MODE button to confirm.
8. Adjust the time by pressing the UP or DOWN buttons
9. Press MODE button to confirm.
10. Adjust the distance by pressing the UP or DOWN buttons
11. Press MODE button to confirm.
12. Adjust the calories by pressing the UP or DOWN buttons
13. Press MODE button to confirm.
14. Press start to begin the workout
15. Level is adjustable during workout.
USER PROGRAM
1. After entering the USER information press UP or DOWN to choose the type of program.
2. Press mode to confirm the program type.
3. After choosing the user program press up or down to adjust the level of intensity of the first segment
4. Press MODE to confirm and move to the next segment
5. Press up or down to adjust the level of intensity of the next segment
6. Press MODE to confirm and move to the next segment
7. Continue this process until all segments have been adjusted
8. There are 20 segments to each program. To create a shorter program, adjust the desired amount of segments then press and hold the MODE button for 3 seconds. The program will be entered.
9. Press start to begin the workout
HEARTRATE CONTROL PROGRAM
1. After entering the USER information press UP or DOWN to choose the type of program.
2. Press mode to confirm the program type.
3. After choosing the HRC program press up or down to select between 55%, 75%, 90%, TARGET.
4. Press MODE to confirm
5. Adjust the time by pressing the UP or DOWN buttons
6. Press MODE button to confirm.
7. Adjust the distance by pressing the UP or DOWN buttons
8. Press MODE button to confirm.
9. Adjust the calories by pressing the UP or DOWN buttons
10. Press MODE button to confirm.
11. If target Heart rate is selected use the UP or DOWN buttons to adjust the target heart rate
12. Press the MODE button to confirm
13. Press start to begin the workout
14. Level is adjustable during workout.
15. Press start to begin
WATT PPROGRAM
1. After entering the USER information press UP or down to choose the type of program.
2. Press mode to confirm the program type.
3. After choosing the WATTS program, 120, the preset watts setting will blink on the screen
4. Press UP or DOWN to adjust the watts value. (wattage range 10-350)
5. Press MODE to confirm
6. Press START to begin
FITNESS TEST
NOTE: This test is based on the amount of distance that can be completed in 12 minutes the resistance level cannot be changed.
1. After entering the USER information press UP or down to choose the type of program.
2. Press mode to confirm the program type.
3. After choosing the FITNESS TEST, the preset training time is 12min at level 5
4. Press start to begin the test
5. Once the 12 minutes has been completed the computer will show the fitness score ranging from F-1 to F-5. F1 is the highest rating and F5 is the lowest
SPECIAL FEATURES DURING THE WORKOUT
1. Press the MODE key to change the matrix display to a track, heart rate chart, watts chart, or speed chart.
2. Press the TEXT MENU key and the will display the current workout mode for 3 seconds
3. Press mode to confirm the program type.
SPECIAL FEATURES DURING A STOPPED WORKOUT
Note: The computer must stay powered to function and the user must be in a paused program (this feature will not function if the computer is on the home screen)
1. Heart Rate Recovery
a. When the program is paused PULSE RECOVERY will be displayed
b. Press the MODE key to enter the recovery heart rate mode.
c. Immediately place both hands on the hand grip heart rate sensors.
d. When the test is complete the computer will display recovery score
e. Press Start to continue the workout
2. Change the work out time distance calories and pulse.
a. When the program is paused PULSE RECOVERY will be displayed
b. Press the MODE key to enter the recovery heart rate mode.
c. Do Not place your hands on the hand grip heart rate sensors.
d. Time will begin to flash
e. Adjust the time by pressing the UP or DOWN keys
f. Press MODE key to confirm.
g. Adjust the distance by pressing the UP or DOWN keys
h. Press MODE key to confirm.
i. Adjust the calories by pressing the UP or DOWN keys
j. Press MODE key to confirm.
k. Adjust the calories by pressing the UP or DOWN keys
l. Press MODE key to confirm
m. Press start to begin the work out again.
3. Press the TEXT MENU key to PULSE, RECOVERY, NEW START, BACK TO EXERCISE, RECALL EXERCISE, and SAVE EXERCISE.
a. Change from one special feature to the other by pressing the UP or DOWN keys
b. Press MODE key to confirm selection
c. Pulse Recovery
i. Press the MODE key to enter the recovery heart rate mode.
ii. Immediately place both hands on the hand grip heart rate sensors.
iii. When the test is complete the computer will display score
iv. Press Start to continue the workout
d. NEW START: Reset the computer to the home screen
e. BACK TO EXERCISE: Return to the current program
f. SAVE EXERCISE: Saves newest training information. (Available for U1-U4 user profiles)
g. RECALL EXERCISE: Review saved training record. (Available for U1-U4 user profiles) Each user has 30 training data records in the computer memory, and the user can refer to previous the previous records by pressing the UP/DOWN button after entering the RECALL EXERCISE mode. The records are stored in the order they were saved with the newest record displayed first.
Back to TopMAINTENANCE
HOW TO MAINTAIN YOUR ELLIPTICAL:
Proper maintenance is very important to ensure your Elliptical is always in top working condition. Improper maintenance could cause damage or shorten the life of your Elliptical and exceed the LIMITED WARRANTY coverage.
Important: DO NOT use abrasives or solvents to clean the Elliptical. To prevent damage to the computer, keep liquids away and keep it out of direct sunlight.
Inspect and tighten all parts of the Elliptical regularly. Replace any damaged or worn parts immediately.
LUBRICATION:
Clean pedal arm wheels every month
Clean and lubricate the Bike every month using silicone lubricant. Spray lightly on all movable parts.

CLEANING:
Routine cleaning of your Semi-Recumbent Bike will extend the product's life.
Warning: To prevent electrical shock, be sure the power to the Elliptical is OFF and the power cord is unplugged from the wall electrical outlet before attempting any cleaning or maintenance.
Important: DO NOT use abrasives or solvents to clean the Elliptical. To prevent damage to the computer, keep liquids away and keep it out of direct sunlight.
After each workout: Wipe off the console and other Elliptical surfaces with a clean, water dampened soft cloth to remove excess perspiration.
Weekly:Use of an Elliptical mat is recommended for ease of cleaning. Dirt from your shoes contacts the pedals and eventually makes it to underneath the Elliptical. Vacuum underneath Elliptical once a month.
Note: when lubricating the slider tubes, make sure the Elliptical is located on a surface that can be easily cleaned. After lubricating your Elliptical slider tubes, clean any excess silicone off of the frame.
Back to TopTROUBLE SHOOTING
| Item | Breakdown | Troubleshooting |
|---|---|---|
| 1 | Computer will not power up | 1. Plug the power adaptor in to the wall outlet
2. Plug the power adaptor jack in to the unit. 3. Test the wall outlet for power. 4. Test the power adaptor for the correct voltage output. 5. Check the power adaptor and adaptor wire for damage. 6. Check for damaged computer cables then reconnect the lower, upper and console cables found on page 5 and 10 of the assembly section. |
| 2 | No resistance level change | 1.When the resistance level is changed does the motor run? Yes
2.Check for damaged computer cables then reconnect the lower, upper and console cables found on page 5 and 10 of the assembly section. 3. Retest resistance |
| 3 | NO Hand pulse figure display | 1. Reposition hands on the pulse grip Do not hold one pulse grip with 2 hands.
2. Reconnect the pulse grip wire inside the pulse grip handle 3. Reactivate the computer |
| 4 | E-1 | 1. E-1 Indicates the computer was not able to calculate the body fat., Reposition hands on the pulse grip. Do not hold one pulse grip with 2 hands. |
| 5 | E-4 | 1. E-4 indicates the user's age, height, weight values have exceed of the maximum setting range when entering the user information. Reenter values that do not exceed the maximum values. |
| 6 | E-2 | 1. Check for damaged computer cables then reconnect the lower, upper and console cables found on page 5 and 10 of the assembly section.
2. Check the Motor and resistance cable for proper positioning. |
| 7 | No speed reading | 1.Check the console together with the stage's 9or12PIN connect cable, to see if the console are bad contact or get loose with the stage's 9or12PIN connect cable.
2. Check the Motor distance have exceed of the setting range or not. |
| 8 | No display of SPEED figure | 1.Check for damaged computer cables then reconnect the lower, upper and console cables found on page 5 and 10 of the assembly section.
2.Check the Speed SENSOR cable for damage and reconnect to the lower board. Check the speed sensor and speed sensor magnet for proper positioning. |
| 9 | Recovery function does not readout | 1.Verify the console is in the STOP mode and is not in a program.
2.Verify the pulse readout is functioning. |
| 10 | Noisy during Movement | 1.Check slider tubes for damage
2.Clean slider tubes with liquid silicone 3.Check pedal arm wheels for damage. 4.Clean pedal arm wheels with mild detergent and lubricate with liquid silicone |
| 11 | Noisy handlebars | 1.Disassemble lower handle bars and check for damage.
2.Lubricate with white lithium grease and reassemble. |

Parts List
| Part# | Description | Quantity |
|---|---|---|
| E250-1L | Upper handlebar left | 1 |
| E250-1R | Upper handlebar right | 1 |
| E250-2 | Screw | 4 |
| E250-3 | Upper computer cable | 1 |
| E250-4 | Computer SM5990 | 1 |
| E250-5 | Handlebar foam | 2 |
| E250-6 | Self-tapping screw | 2 |
| E250-7 | Handlebar end cap ?25 | 2 |
| E250-8 | Hand pulse cable | 1 |
| E250-9 | Anti-loose Allen bolt M8*20 | 6 |
| E250-10 | End cap ?32*60 | 2 |
| E250-11 | Upper handlebar foam | 2 |
| E250-12 | Hand pulse pads | 1 |
| E250-13 | Handlebar | 1 |
| E250-14 | Rotation rod | 1 |
| E250-15 | Washer ?19.5*38*0.5mm | 2 |
| E250-16 | Curve washer ?8*19*1.5t | 28 |
| E250-17 | Allen bolt M8*20mm | 32 |
| E250-18 | Bushing ?19*38mm | 10 |
| E250-19 | Washer ?8.5*36*3tmm | 4 |
| E250-20 | Spring washer ?8 | 38 |
| E250-21 | Hex nut M10*1.25*5tmm | 1 |
| E250-22 | Hex nut M10*1.25*4tmm | 1 |
| E250-23 | Bearing 6000RS | 1 |
| E250-24 | Flywheel axle | 1 |
| E250-25 | Flywheel | 1 |
| E250-26 | Bearing 6300RS | 1 |
| E250-27 | Magnet | 6 |
| E250-28 | Plastic support for magnet | 1 |
| E250-29 | Coil | 1 |
| E250-30 | Screw | 1 |
| E250-31 | Belt adjustment set | 2sets |
| E250-32 | Hex nut M8*5t | 1 | E250-33 | Washer ?8*16*1.5t mm | 1 | E250-34R | Chain cover right | 1 | E250-34L | Chain cover left | 1 | E250-35R | Front end cap right | 1 | E250-35L | Front end cap left | 1 | E250-36 | Plastic cover | 1 | E250-37 | Allen bolt M8*55mm | 2 | E250-38 | Flat Washer ?8*19*1.5mm | 10 | E250-39 | Front stabilizer 75*45*1.5*550mm | 1 | E250-40 | Round-headed screw M5*15 | 6 | E250-41 | Drilling screw M5*15 | 6 | E250-42 | C shape washer ?18 | 1 | E250-43 | Washer ?20.5*25*2t mm | 2 | E250-44 | Spring | 1 | E250-45 | Round-headed screw M4*15 | 4 | E250-46 | Lever support | 1 | E250-47 | DC cable | 1 | E250-48 | DC output cable | 1 | E250-49R | Lower handlebar right | 1 | E250-49L | Lower handlebar left | 1 |
| E250-50 | Controller | 1 |
| E250-51 | Motor | 1 |
| E250-52 | Screw M5*12mm | 5 |
| E250-53 | Main frame | 1 |
| E250-54 | Lower computer cable | 1 |
| E250-55 | Handlebar post | 1 |
| E250-56 | Sensor | 2 |
| E250-57 | Sensor set | 2 |
| E250-58 | Washer ?20.5*25*1t mm | 1 |
| E250-59 | Washer ?10*16*1.5t mm | 1 |
| E250-60R | Plastic cover for lower handlebar left | 2 |
| E250-60L | Plastic cover for lower handlebar right | 2 |
| E250-61 | Belt wheel | 1 |
| E250-62 | Belt | 1 |
| E250-63 | Pedal Axle | 1 |
| E250-64 | Anti-loose Allen bolt M8*15 | 4 |
| E250-65 | Round cover decoration | 2 |
| E250-66 | Crank | 1 |
| E250-67 | Round cover | 2 |
| E250-68 | Screw M5*12mm | 8 |
| E250-69 | Joint lever for chain cover 50mm | 1 |
| E250-70 | Self-tapping screw M4.5*25mm | 4 |
| E250-71 | Joint lever for chain cover 90mm | 2 |
| E250-72 | Allen bolt for footplate M8*20mm | 8 |
| E250-73L | Pedal left | 1 |
| E250-73R | Pedal right | 1 |
| E250-74 | Allen bolt M10*78mm | 2 |
| E250-75L | Pedal connecting tube left | 1 |
| E250-75R | Pedal connecting tube right | 1 |
| E250-76 | Tube spacer ?14*59.3mm | 2 |
| E250-77L | Supporting tube left | 1 |
| E250-77R | Supporting tube right | 1 |
| E250-78 | Bushing | 4 |
| E250-79 | End cap ?40*80mm | 2 |
| E250-80 | Rear stabilizer | 1 |
| E250-81 | Hex nut M10 | 5 |
| E250-82 | Idler axle | 1 |
| E250-83 | Idler | 1 |
| E250-84 | Washer ?6*13*15mm | 1 |
| E250-85 | Hex screw M6*12mm | 1 |
| E250-86 | Rechargeable Battery stator | 1 |
| E250-87 | Rechargeable battery | 1 |
| E250-88 | C shape washer ?11 | 2 |
| E250-89 | Magnet fixed axle ?12*50mm | 1 |
| E250-90 | Magnet holder 2.5t | 1 |
| E250-91 | Spring washer ?6 | 2 |
| E250-92 | Hex screw M6*16mm | 2 |
| E250-93 | Bearing 6004 RS | 2 |
| E250-94 | Wave washer ?20.5*25*0.5t mm | 1 |
| E250-95 | Round-headed screw M5*10mm | 4 |
| E250-96 | Nut M10 | 2 |
| E250-97 | Washer ?10*19*2t mm | 2 |
| E250-98 | Bushing ?32*14 mm | 4 |
| E250-99 | Nut M10*1.25 | 2 |
| E250-100 | Bushing ?16.3*22.4mm | 4 |
| E250-101 | Fixing plate | 2 |
| E250-102 | Tube spacer ?12*8.5*55mm | 2 |
| E250-103 | Washer ?12.5*15*2t mm | 2 |
| E250-104 | Decoration cover | 2 |
| E250-105 | Allen bolt M8*70mm | 2 |
| E250-106 | Adjustable round wheel M10 | 4 |
| E250-107 | Rear end cap | 2 |
| E250-108 | Connecting tube ?25*1.5*236mm | 1 |
| E250-109 | Allen bolt M8*75mm | 2 |
| E250-110 | Waved washer ?12.5*18*0.37 | 4 |
| E250-111 | Wheel | 2 |
| E250-112 | Bearing 6001RS | 4 |
| E250-113 | Nut M8 | 2 |
| E250-114 | Cable | 1 |
| E250-115 | AC input cable | 1 |
| E250-116 | Sliding beam | 2 |
| E250-117 | Allen key wrench | 2 |
| E250-118 | Combination wrench | 1 |
| E250-119 | Adaptor | 1 |
Warning:
Before using this product, please consult your personal physician for a complete physical examination. Frequent and strenuous exercise should be approved by your doctor first. If any discomfort should result from your use of this product, stop exercising and consult your doctor. Proper usage of this product is essential. Please read your manual carefully before exercising.
Please keep all children away from the equipment during use and when equipment is unattended.
Always wear appropriate clothing, including athletic shoes, when exercising. Do not wear loose clothing that could become caught during exercising.
Make sure that all bolts and nuts are tightened when equipment is in use. Periodic maintenance is required on all exercise equipment to keep it in good condition.
Before beginning:
How you begin your exercise program depends on your physical condition. If you have been inactive for several years, or are severely overweight, you must start slowly and increase your time gradually, a few minutes per week.
Initially you may be able to exercise only for a few minutes in your target heart rate zone. However, your aerobic fitness will improve over the next six to eight weeks. Don't be discouraged if it takes longer. It's important to work at your own pace. Ultimately, you'll be able to exercise continuously for 30 minutes. And the better your aerobic fitness, the harder you will have to work to stay in your target heart rate zone. But remember these essentials:
Contact your physician before starting a workout or training program. Have your doctor review your training and diet programs to advise you of a workout routine you should adopt.
Begin your training program slowly with realistic goals that have been set by you and your doctor. Supplement your program with some type of aerobic exercise such as walking, jogging, swimming, dancing and/or bicycling. Monitor your pulse frequently. If you do not have an electronic heart rate monitor, have your physician show you the proper way to manually check your pulse by using your wrist or neck. Establish your target heart rate based on your age and condition.
Drink plenty of fluids during the course of your routine. You must replace the water content lost from excessive exercising to avoid dehydration. Avoid drinking large amounts of cold liquids. Fluids should be at room temperature when consumed.
Back to TopHeart Rate Chart
| Age | Heat rate frequency range 50-75%
(beats per minute) - ideal training pulse - |
Maximum heart rate frequency 100% |
|---|---|---|
| 20 years | 100-150 | 200 |
| 25 years | 98-146 | 195 |
| 30 years | 95-142 | 190 |
| 35 years | 93-138 | 185 |
| 40 years | 90-135 | 180 |
| 45 years | 88-131 | 175 |
| 50 years | 85-127 | 170 |
| 55 years | 83-123 | 165 |
| 60 years | 80-120 | 160 |
| 65 years | 78-116 | 155 |
| 70 years | 75-113 | 150 |
COPYRIGHT(c) 1997 AMERICAN HEART ASSOCIATI0N
Back to TopWarm-up / stretching exercises
A successful exercise session begins with warming up exercises and ends with exercises for cooling down and relaxing. These warming up exercises prepare your body for the subsequent demands made upon it. The cooling down / relaxation period after the exercise session ensures that you do not experience any muscular problems. Below you will find stretching exercise instructions for warming up and cooling down.
NECK EXERCISES
Tilt your head to the right and feel the tension in your neck. Slowly drop your head down to your chest in a semi-circle and then turn your head to the left. You will feel a comfortable tension in your neck again.
You can repeat this exercise alternately several times.

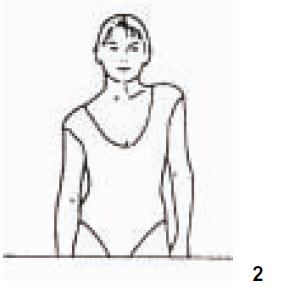
EXERCISES FOR THE SHOULDER AREA
Lift the left and right shoulders alternately, or lift both shoulders simultaneously.
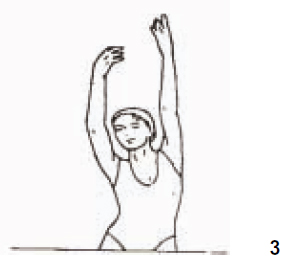
ARM STRETCHING EXERCISES
Stretch the left and right arms alternately towards the ceiling. Feel the tension in your left and right side. Repeat this exercise several times.
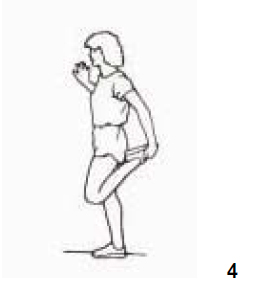
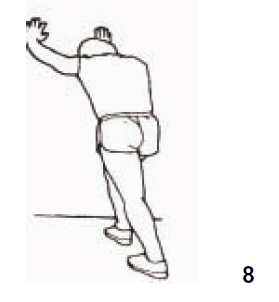
EXERCISES FOR THE UPPER THIGH
Support yourself by placing your hand on the wall, then reach down behind you and lift up your right or left foot as close to your buttocks as possible. Feel a comfortable tension in your front upper thigh. Maintain this position for 30 seconds if possible and repeat this exercise 2 times for each leg.
INSIDE UPPER THIGH
Sit on the floor and place your feet in such a way that your knees are facing outwards. Pull your feet as close as possible to your groin. Now press your knees carefully downwards. Maintain this position for 30-40 seconds if possible.

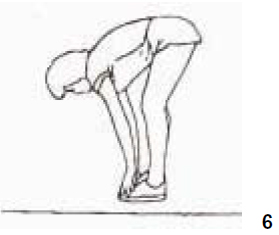
TOUCH TOES
Bend your trunk slowly forwards and try to touch your feet with your hands. Reach down as far as possible to your toes. Maintain this position for 20-30 seconds if possible.
EXERCISES FOR THE KNEES
Sit on the floor and stretch out your right leg. Bend your left leg and place your foot on your right upper thigh. Now try to reach your right foot with your right arm. Maintain this position for 30-40 seconds if possible.

EXERCISES FOR THE CALVES/ACHILLES TENDON
Place both hands on the wall and support your full body weight. Then move your left leg backwards and alternate it with your right leg. This stretches the back of the leg. Maintain this position for 30-40 seconds if possible.
LIMITED HOME USE WARRANTY ���¢��������Elliptical Warranty
Warranty Coverage: InternetFitness.Com warrants to the original owner that each new product to be free from manufacturing defects.
Period of Coverage: The Warranty on this product runs from the date of original purchase using the following schedule:
| Model Name | Frame / Brake System | Parts & Electronics | Labor |
|---|---|---|---|
| E220 | Lifetime | 1years | 1year |
Labor: InternetFitness.Com will reimburse for labor costs for one year. InternetFitness.Com reserves the right to either:
Hire and reimburse an independent service technician, who will come into the home for the repair,
OR
In the event that there is not an available certified 1800Treadmill.Com service technician, the customer can ship the product back to an 1800Treadmill.Com service center for repair. All shipping charges are the responsibility of the customer.
1800Treadmill.Com reserves the right to inspect damaged parts for misuse. Your Original Receipt is proof of purchase and should be kept with the product manual. You may be required to show proof of purchase prior to warranty service being initiated.
Remedy Provided by InternetFitness.Com: InternetFitness.Com will provide a replacement part free of charge if a defect is found during the Warranty period. InternetFitness.Com may at its discretion, choose to provide any of following parts or repair options. In the event that a part is determined in need of replacement, upon receipt of the part by InternetFitness.Com, 1InternetFitness.Com may send out the part by UPS ground or another such carrier directly to the customer's home at the customers expense.
Any redemption may be by repair or replacement of the affected parts and/or product at the sole discretion of InternetFitness.Com, by personnel approved by InternetFitness.Com. Parts repaired or replaced pursuant to this Warranty shall be warranted for the unexpired portion of the Warranty applying to the original product. Any technical advice furnished before or after delivery in regard to the use or application of 1800Treadmill.Com products is furnished without charge and on the basis that it represents InternetFitness.Com' best judgment under the circumstances but that the advice is used at your sole risk.
Procedure for Obtaining Your Remedy Under This Warranty: To obtain service on an InternetFitness.Com product, call InternetFitness.Com. In the instance that service is not available in an area, InternetFitness.Com, at its discretion, can either 1) find a service technician in your area to perform warranty service, 2) have a local dealer perform warranty service, or 3) send the warranty parts to you and reimburse as described above. To help the technician assist you, please have the following information ready:
Model name or number from the cover of the manual; Serial
The part description and the order number.
Limitations on Warranty: This Warranty does not cover any problems, damages or failures that are caused by accident, improper assembly, failure to observe cautionary labels on the product, failure to operate the product correctly, power grid failures or spikes from your local electricity provider, abuse or freight damage. 1800Treadmill.Com does not warrant against any damage or defects that may result from repair or alterations made to the product by an unauthorized repair facility. In order for this warranty to be valid, all nternetFitness.Com exercise equipment must be stored and used in a fully finished and livable room within the residence free from excessive humidity (Warranty void if placed in swimming pool area).
This Warranty shall terminate if you sell or otherwise transfer this product. This Warranty does not apply to any product shipped or handled outside of the United States or Canada. This Warranty does not apply if the product is used as a rental product or in commercial use. Consequential and incidental damages are not recoverable under this Warranty. (Some states do not allow the exclusion or limitation of incidental or consequential damages, so the above limitation or exclusion may not apply to you.)
THIS WARRANTY IS EXPRESSLY IN LIEU OF ALL OTHER EXPRESS WARRANTIES. ALL IMPLIED WARRANTIES, INCLUDING WARRANTIES OF MERCHANTABILITY OR FITNESS FOR ANY PARTICULAR PURPOSE, ARE LIMITED IN DURATION TO 90 DAYS FROM THE EFFECTIVE DATE OF THIS WARRANTY. 1800Treadmill.Com IS NOT LIABLE FOR CONSEQUENTIAL OR INCIDENTAL DAMAGES RESULTING FROM ANY DEFECT IN PARTS NOR FOR ANY BREACH OF EXPRESS OR IMPLIED WARRANTIES. INTERNETFITNESS.COM' SOLE LIABILITY UNDER THIS WARRANTY IS LIMITED TO THE TERMS DESCRIBED IN THIS FORM. THIS WARRANTY GIVES YOU SPECIFIC LEGAL RIGHTS, AND YOU MAY ALSO HAVE OTHER RIGHTS WHICH VARY FROM STATE TO STATE.
FORM WS-1 (rev. 03/2008)
Back to Top